ProfiTrace for Commissioning New PROFIBUS Networks
The ProfiCaptain STOP Mode has previously been explained as offering a quick way of testing a ProfiCore Ultra adapter and for measuring PROFIBUS cable lengths – see links below for associated instructions.
ProfiCaptain STOP mode is also useful for commissioning new PROFIBUS networks.
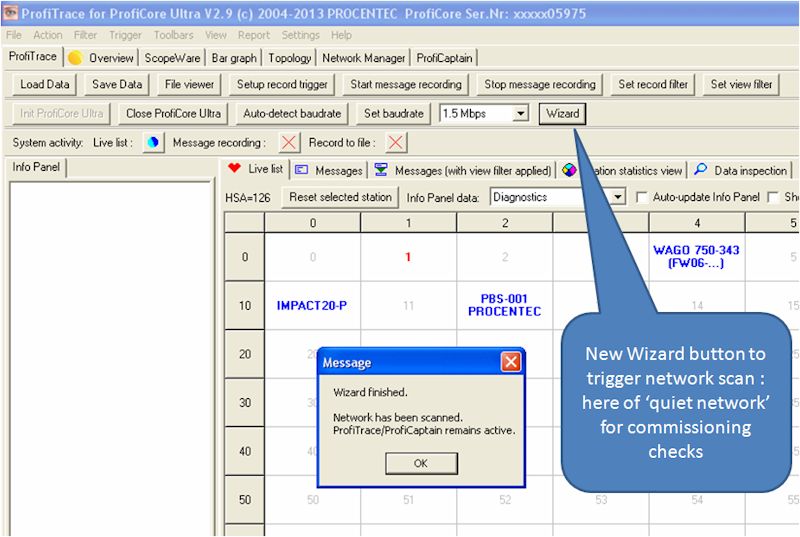
When a ProfiCore Ultra is connected in place of a PLC/Master on a new network and runs ProfiCaptain in STOP mode, the software scans for devices connected to that network and will show these in the normal Live List as blue characters at each associated address position. Both driver voltages and waveforms will also be available for each device on Bar-graph and ScopeWare pages.
You do not need GSD files, or a ProfiCaptain software licence for this procedure which is now automated under the new Wizard button in ProfiTrace V2.9.0+ software. The following screen image shows the location of the Wizard button and typical Live List information resulting from a ‘Quiet network’ scan (here showing associated slave names, taken from available GSD files. When GSDs are not available a hex slave ID number shows at each slave address).

This procedure allows confirmation of network cable integrity from the ProfiCore Ultra (Master) to at least the last shown slave, checking of the network waveform quality (square shape and good levels), correct setting of terminators at each end of the segment, correct (unique) slave addresses and that each slave is powered and at least responding correctly to Master interrogations.
When a new network is not found to work correctly for this test, you should gradually reduce it’s length by switching in terminators at successive far end slave device connectors (so disconnecting ongoing cable) until successful operation is eventually achieved. If necessary reduce down to one length of cable and one slave, then build up again from there in order to locate and correct evident faults!
Once you have one or more slaves working on the network, you should then be able to check arrangement using the Topology Scan program, for diagram of the slave sequencing and cable lengths to and between each. In order to do this successfully you will need at least 3 metres of PROFIBUS cable between the ProfiCore Ultra and the first slave – and set the Topology program for ProfiCaptain as Master. Note that you will need ProfiCaptain running (in Stop mode) at the default 1.5 Mbps to run the Topology program. If this is to be run after the previously mentioned Wizard scan, you may first need to reset the baud rate to allow a Topology Scan.

If the Wizard scan is not used, full details of all connected devices can be found by running a Class 2 Commands Scan from the ProfiCaptain screen. On returning to the ProfiTrace Live List page details of all detected slaves should now been shown in blue characters on a white background (as in top illustration). Where associated GSD files are found, manufacturer and device types should be shown. Where associated GSD files are not found only the device ID codes will be shown as 4 hex characters – these may then be used in Internet searches for further information and copy of associated GSD files which may then be added to your ProfiTrace GSD library.
With full ProfiCaptain licence available, and associated slave GSD files, you should next be able to bring all available slaves into Data Exchange, sending stepping test data to each and displaying returned data values to further confirm correct operation of all kit, before availability and/or connection of the eventual PLC/Master.
Further details of above commissioning procedure
Please let us know if you find this page useful, and any enhancements (or corrections) which you would like to see!